Comb and Foundation
Embedding Tools
Embedding Board
Wiring Frames for Unwired Foundation
Making Foundation Presses
Herring Foundation Method
|
|
|
|---|
|
Comb and Foundation Embedding Tools Embedding Board Wiring Frames for Unwired Foundation Making Foundation Presses Herring Foundation Method |
Leaf Foundation Press for Home Made Beeswax Foundation |
|---|
The Leaf foundation presses were probably made during the 1970s, possibly into the 1980s. I am unable to find out anything about the company or what happened to it. As an engineer, I thought they were well made, but were introduced at the wrong time. I remember several being made and I still occasionally come across one. I felt they had a few design flaws compared to the Herzog press that I have, the main one being the lid had standard hinges, so you couldn't separate the two plates. This made it heavy and difficult to remove the sheet of foundation. I suspect, through not getting the right mix of release agent, the sheet stuck onto the plates. Digging it off with a knife, screwdriver or nail resulted in the damage I saw in some presses. With care, I think many sheets of foundation could have been produced. West Sussex BKA bought one for each Division, but few were used, which is a pity. R. P.
|
This version of foundation making press called a "Beeswax Foundation Mould" was manufactured by the 'Leaf Products' company, then of 24 Acton Road Long Eaton, Nottingham, England, NG10 1FR. The matrix impression plates are made by electro-deposition of copper on to wax 'master' sheets that had been sprayed with an electrically conductive paint. This method of casting beeswax foundation produces fine quality sheets of home made foundation that are slightly more brittle than foundation produced by the milling process. This brittleness is increased if the sheets are exposed to freezing temperatures, even after the temperature is returned to normal. |

|
|---|
|
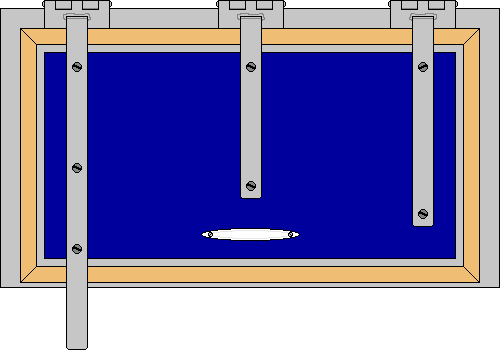
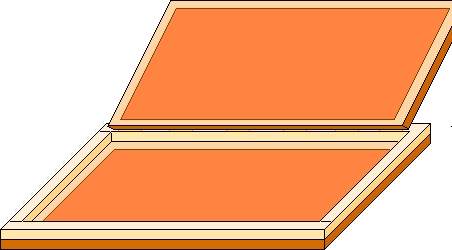
The drawing above shows the press in the closed position, the extended left hand hinge acts as a lever for when the mould sticks shut. The handle is a chromed metal article. The wooden rim is a 16 mm quadrant moulding made from ramin. The picture at right is of a home made press, but shows the principle of what the leaf press looks like when opened. |

|
|---|
- Double boiler (e.g. a bowl floating in a pan of water) in which to melt the beeswax.
- Mug or ladle for pouring molten beeswax (DO NOT USE copper, brass, or iron - These discolour and harm wax) (A plastic mug or jug is inexpensive and does not cool the wax too much).
- Board or metal sheet of the size required as a template for finished sheets. (make this template slightly large to allow for shrinkage)
- Knife or Pizza Cutter to cut around the template.
- Release agent (e.g. rain water with a drop of liquid detergent two or three percent of alcohol and a spoonful of honey and/or a dash of lemon or lime juice may also be added if required).
To prepare the mould before using for the first time :-
- Wet both the mould dies with release agent.
- Pour very small cupful of liquid detergent (washing up liquid) on to each part of the mould.
- Scrub very gently with small nylon brush all over both mould plates and the wooden surround.
- Rinse off the detergent using release agent.
- Pour in approximately 500 ml of release agent to thoroughly wet both mould plates and the wooden surround.
- Close the mould to ensure even wetting. Then open a little and pour the release agent back into it's storage pot.
- Before the release agent dries pour in the molten beeswax to cover base of mould. Close lid of mould quickly, but gently.
- Pour the excess wax back into wax pot.
- Leave the mould until the wax has cooled to a firm, but cheesy solid - (perhaps one to two minutes is suggested in the Steele & Brodie leaflet, but I find 30 seconds is enough.) There should be enough time to trim the previous sheet to size as in step ( I ).
- Open the mould. The solid sheet should stick to one side of the mould - usually the top.
- Trim the excess wax from the two sides and top (using a blunt knife). Use the bottom edge to pull the sheet away from the mould (start at one corner).
- Discard and re-melt the first few uneven sheets (caused by the mould warming up to the optimum operating temperature).
- Allow the fresh sheet to cool for two to three minutes (for most of the shrinkage to take place). Place the foundation on a flat surface. Then using the template and knife (or pizza cutter), cut the sheet to the size required. Off cuts and unsatisfactory sheets can be returned to the molten wax reservoir (this helps to maintain the melt at just the melting point of the wax).
TAKE CARE - BEESWAX IS FLAMMABLE. Never place beeswax on direct heat (e.g. open fire, gas stove, boiling ring etc.) Always use a double boiler or water bath.
- Pour on COLD release agent to loosen wax.
- If still sticking, pour hot (not boiling) rain water over the wax to melt it away. Scrub with a small nylon brush and liquid detergent to remove remaining wax. Use a sharpened wooden stick to pick off small pieces of wax.
NEVER use sharp tools or a wire brush to clean this mould. The mould plates are made from electro - formed copper. If they are marked or damaged in any way... All sheets cast will also be marked and damaged. TAKE CARE.
After continuous use, the release agent will get hot and slow down the setting time. Replace with cold solution and keep topping up the wax melting pot with solid wax to keep the temperature at only just above the wax melting point.
Much of this text has been taken from a leaflet, produced by Steele & Brodie, that was included with the press when they were sold. Many of the comments on the Herring page are also valid when making foundation using this type of press.
Try for as high an ambient temperature as possible along with as low a wax temperature as can be achieved. If the mould is really stuck shut, do not use excessive force, but allow to cool for 24 hours in a deep freeze.
Dave Cushman.
Page created 06/04/2002
Generated... 31 March & 06 April 2002, Upgraded... 24 November 2005,
|