30-06 Springfield
|
|
|
|
|---|
|
30-06 Springfield |
Swaging Rims On To Normally Un-rimmed Cartridge Cases |
|---|
This page has been inspired by an article that I read in 'Guns & Ammo' magazine September 1969 edition. When I read the article all those years ago it made me realise just how much brass could be 'worked' by swaging and not to be 'put off' by what might seem to be a difficult task.
The original article was titled RIMMING THE RIMLESS and was written by Duncan A. Douglas, Jr. I have not sought permission to publish the article and so I will re-phrase it using my own words with a few direct quotes (these quotes will show as dark green text). The article was subtitled... Swaging bullets is no problem, but have you ever tried swaging your own cases? If you have the need, here's how!
"The scarcity of rimmed brass was pounded home to me when I undertook to locate a rimmed cartridge for a lovely little L. Christophe double rifle. I was not looking for the original cartridge that the rifle had been chambered for because when I bought the gun, it had been re chambered, probably with a rusty drill bit, to accept of all things, a .410 shotgun shell."
Chamber casts had revealed the chambers to be too big to be simply re chambered for any available cartridge, so Duncan decided to try sleeving them so in order to use a reasonable size case. This he did successfully and he started looking for a suitable case for which to re chamber. He needed a case large enough to take the .425 diameter bullets that the barrels of this gun required. This meant a case with at least a .30-06 head diameter. He thought the .444 Marlin case was a likely prospect and the 9.3x74 R looked even better because it is longer and would bring the bullet closer to the start of the rifling grooves, but he could not locate any cases for either of these.
In the mean time he had necked several '06 cases up to .44 and he decided that they made a beautiful case and that they would have been just what he was looking for, if they only had a rim. He started toying with the idea of adding a rim on to a rimless case. He knew that if he succeeded in rimming the '06 case it would of course work on all the other cartridges that use the same head size or the principle would work with any rimless case. This would be useful to owners of single-shot rifles who wanted to chamber their guns for some modern case or to people with weapons chambered for 7x57, 8x57, etc.
Duncan began by machining away the extractor rim from a 30-06 case, removing metal down to the depth of the extractor groove. He then machined a collar from brass and pressed it on to the case. The result looked good, you could hardly see where the rim had been put on. He was feeling quite proud of himself until it crossed his mind that the firing pin blow might be enough to drive the case forward out of the rim.
"I put an empty case into the double rifle and pulled the trigger several. times, sure enough, the case had moved forward about 1/32nd of an inch. Next I tried soft soldering the rim in place. This worked all right, but I didn't like the idea of heating the cartridge head and there was no way of telling how well soldered the joint was.
He read George Nonte's book 'The Home Guide to Cartridge Conversions' and while it offered no solution to his problem, he was struck with the way brass could be squeezed, stretched, necked, expanded, spun and pushed every which way. Then while taking a night school course in manufacturing processes, while reading a chapter on swaging and metal forming, a thought struck him... Why not swage a rim on? If the brass could be forced into the extractor groove on a rimless case, this would anchor it securely.
|
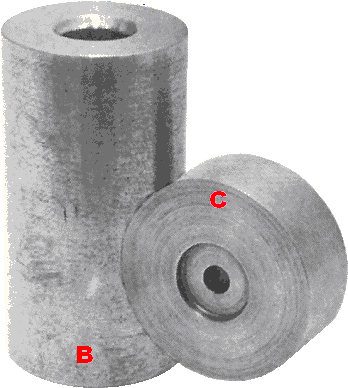
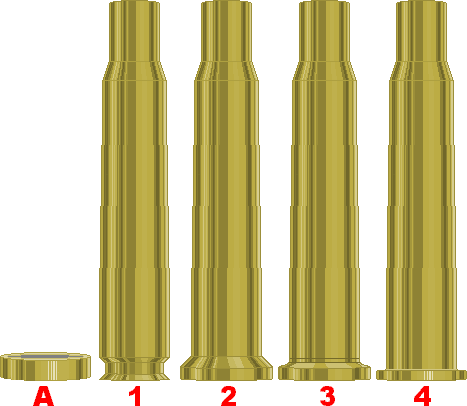
A simple two piece set of dies was made. The bottom half (C) of this has a recess, .600 inch in diameter and .060" deep. The top half (B)is a cylinder with a central hole that will slip over the cartridge with a minor amount of clearance. This cylindrical block is flat at one end and there is a 45 ° chamfer around the hole on the other end. The front of the extractor rim on the case is machined (1) at an angle so that it forms a sharp edge at the rear of the cartridge. That way there will be more metal at this point in the new rim, giving strength and resistance from fretting. The rim (A) is formed from a brass collar .600 inch o.d. .470 i.d. and .125 inch deep. A soft ductile brass must be used for this ring component or the metal will not flow into the groove properly, resulting in a loose rim. |

|
|---|
|
Because the metal cannot be precisely controlled during the flow phase, the rim must be made over-sized and then machined to size after swaging (4). |
A great deal of force is required for this process, probably beyond the capability of any ordinary sized loading press, but a heavy bench vice can be used, as can a fly-press or any other industrial press of suitable size.
Duncan goes on to tell us...
"Well, I had my rimmed case; I call it the .44-06 Rimmed Douglas. This operation in no way weakens the original case and when done properly these rims are on for good and will stand a lot of abuse. I have reloaded some of these cases ten times and they are still good.
The dimensions given are for the .30-06 head size. This will of course work for the 7x57 R, 8x57 R or any of the myriad cartridges in the .30-06 family. The same method can be used to rim any rimless cartridge. I have rimmed the .222 Remington and it worked equally well."
|
The cases depicted in the drawings are 30-06 cases that have not been 'necked up'. The drawing at right mimics the illustration in the original article, the cross section drawing has been done from scratch in the same style as the original and the picture of the dies has been scanned from the original page. (A) Brass ring/rim. (1) case with rim turned down to a sharp edge. (2) After the first pressing, a cone-shaped rim is formed. (3) The second pressing gives a firmly seated, over-size rim. (4) Final portion of the process is finish-machining to dimension. |

|
|---|
Editors Note... As there is a pistol calibre designated 44-06, I have denoted this cartridge as 44-06 R Douglas in my listings.

The drawing shows the original 30-06 profile and the final profile of the 'rimmed Douglas', as it contains fine detail it may be more easily seen by saving to your computer and using an image manipulation application to view at larger than life size.
There are many variants of the 30-06, there is a complete range of wildcat Hawk calibres that are based on 30-06 brass, but none of them has a bullet of this diameter. The simple reason is that normally the rounds headspace on the shoulder of the cartridge and in the case concerned on this page we are dealing with a double rifle that headspaces on the rim that we have taken so much trouble to add to the brass. Part of the Hawk system involves the supply of 30-06 cylinder brass which would make a very good starting point for a similar project.
Original Article... September 1969, This Page Written... 13, 15 & 16 January 2007,
|