| "E" Home |
|---|
| Prev. Menu |
|---|
RS Components
Wire Gauge Chart
|
ELECTRONICS "A-Z" INDEX |
|---|
| Back |
|---|
|
|
RS Components Wire Gauge Chart |
RM Series Ferrite Cores
|
|---|
|
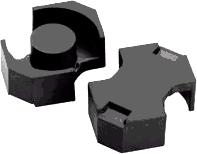
The illustration at right shows a pair of simple cores.
There is another version that has a hole axially through the centre
limb with either a brass thread or a threaded nylon tube so that an
adjusting slug can be screwed in and out.
Generally the mating surfaces are ground flat for minimum reluctance, but some types have deliberately shorter central limbs in order to provide a central air gap... This increases reluctance markedly, but narrows the tolerance on the reluctance considerably. |

|
|---|

|
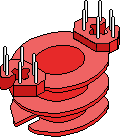
The moulded bobbin shown here fits the annular space inside
a pair of cores. The pins are arranged as "dual in line" or sometimes
in groups as shown.
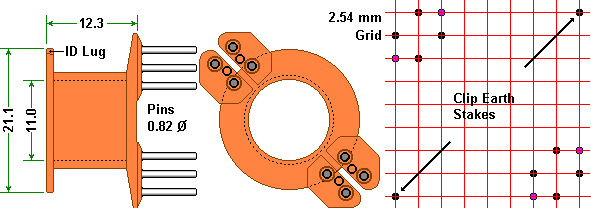
Whatever the arrangement of pins it is common for the inter pin distances to be arranged on a 2.54 mm (0.1") grid. |
|---|
| The completed assembly is held together by spring steel clips of the shape indicated at right. The clips have extensions that can be soldered into a circuit board at the same time as the bobbin pins lending mechanical strength and stability to the inductor or transformer concerned. |

|
|---|

|
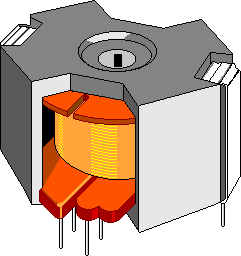
A completed inductor is shown in this drawing. It is of a
type that has a central, threaded, adjuster slug.
The drawing is a little stylised, but it is typical and was drawn from an actual RM10 example. Throughout the rest of this page the examples quoted and types and dimensions are those of the particular versions offered by RS Components Simply because they are a supplier that is local to where I live and has been plundered for some of the information given here. If you use components from a different supplier then you must use the design parameters published by that particular supplier rather than any figures quoted here. |
|---|
| Size Designation | Para meter | RM6 | RM7 | RM10 | ||
|---|---|---|---|---|---|---|
| Inductance factor (nH/turns2) (gapped cores) | AL | 160 | 250 | 250 | 250 | 400 |
| Centre limb gap | mm | 0.2 | 0.11 | 0.25 | 0.55 | 0.21 |
| Core Material | P11 | P11 | P11 | P11 | P11 | |
| Permeability (effective) | µe | 109 | 171 | 146 | 100 | 159 |
| Range of adjustment | +% | 20 | 14 | 15 | 17 | 20 |
| Frequency range (recommended) | kHz | 5.5-800 | 3.5-700 | 3-650 | 2-650 | 1.2-500 |
| Path length (effective) | mm | 26.9 | 26.9 | 29.6 | 41.7 | 41.7 |
| Path area (effective) | mm2 | 31.3 | 31.3 | 40.3 | 83.2 | 83.2 |
| Winding area (single section bobbin) | mm2 | 15 | 15 | 21 | 41.5 | 41.5 |
| Material | AL | Size | µe | Tolerance (%) |
|---|---|---|---|---|
| P11 | 2000 | RM6 | 1385 | -20 +30 |
| F9 | 4625 | RM6 | 3200 | -20 +30 |
| F10 | 6200 | RM6 | 4295 | -20 +30 |
| F39 | 8600 | RM6 | 5955 | -30 +40 |
| P11 | 2800 | RM7 | 1560 | -20 +30 |
| F9 | 4690 | RM7 | 2610 | -20 +30 |
| P11 | 3960 | RM10 | 1575 | -20 +30 |
| F9 | 7600 | RM10 | 3025 | -20 +30 |
| F9C | 8060 | RM10 | 3205 | -20 +30 |
RM6 Bobbin dimensions
|
Reduce the winding area by 1 mm2 for a two
section bobbin.
There is a 4 pin version that has pins in the 2, 3, 5, and 6 positions. The plastic bobbin is sometimes a dark grey colour rather than the brick red shown in the drawings. |
|---|
RM7 Bobbin dimensions
| Pin layouts for 8 & 5 pins are shown. |
|---|
RM10 Bobbin dimensions
|
Reduce the winding area by 2.5 mm2 for a two section bobbin.
The black dots on the grid represent 8 pin layout and the pink ones are added for 12 pin version. |
|---|
The turns required can be calculated by using the formula below.To overcome these problems we will need a core without an air gap in the centre limb so that we can have a higher figure for AL (but a wider tolerance on final inductance). If we use an RM10 (adjustable) in an F9 type ferrite we can have 7,600 for our value of AL Which modifies the figure to 925 turns (we will actually wind 463 turns, make a tapping and then wind a second lot of 463 turns to get our centre tap). This is still a high number of turns, but is more achievable. Our tolerance on final inductance is plus 30% or minus 20% and we will have to make a second attempt if our finished choke does not test out correctly.
Total turns = 
Where L is the inductance required expressed in nH (10-9H) and AL is the Inductance factor from the table further up this page.
As 250 occurs as a value for AL in all of the 3 frame sizes it is a convenient number to use. Dividing 6,500,000,000 by 250 gives 26,000,000, Taking the square root of that gives us a figure of 5,099 for the turns required.
This is unacceptable on three counts, first the number of turns would be tedious to wind and count by hand, secondly the wire would need to be very thin to accommodate the number of turns in the window space of even the large RM10 core. The third reason is that the long length of very thin wire would have a significant resistance and this would introduce losses that were too large to ignore.
Written... 13 December 2001, Revised... 18 December 2001, Revised... 20 February 2002, Amended... 16 April 2002, New Domain 12 April 2004, |